Practice your react skills throughout building a fun game
Building a Sheep Counting Game with React: A Step-by-Step Guide


Introduction :
This article assumes that you have a basic knowledge of react.
We will build a game for counting sheep, and we will use concepts like Context API and useState, useRef.
Don't freak out if you are not familiar with these concepts I will explain them to you and you will harness the power of working with a global state it's a pice of cake.
🛑 If you found anything hard to grasp or didn't understand something or need anything in general send me a message on my Instagram and I will gladly help you
What we are going to build :
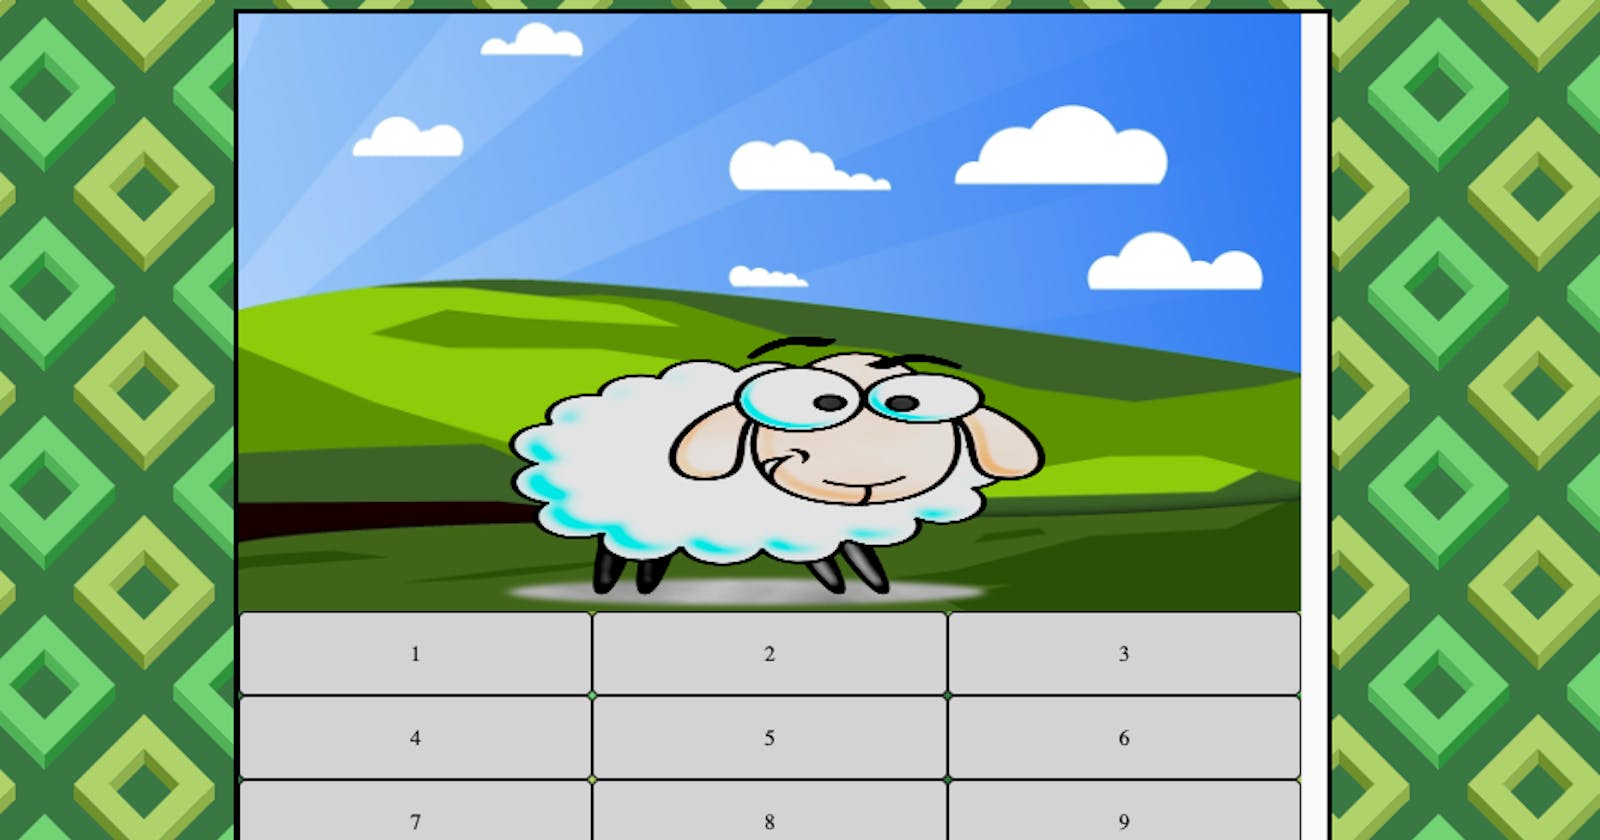
The sheep counter is a small game that helps people fall asleep by letting them count the sheep, In general, the user should memorise the number of the last sheep seen.

As you can see in the demo when our app first landed the sheep's number was 1 when the user guessed right the sheep image was gone and another one came (this can be achieved via CSS ) when the user guessed wrong we showed an image of a sheep saying nop.
We will walk through each step together 😊.
Build the structure of the Application :
1- Go to the folder you want to create the app in open it in the terminal and copy-paste the following command :
npx create-react-app my-app
If you want to create a PWA which means creating a website that could be installed on mobile phones and feels like a mobile app (we will see how to make it in the next article) :
npx create-react-app my-app --template cra-template-pwa
2- When the application is successfully created go to src folder and create the following folders :
i_ components ( Where we will put our components )
ii_ assets ( where we will put our images and other sources like audio etc... )
iii_ provider ( where we will create our context API )
iiii_ Style ( where we will create our styles )
Create a global state known across all the components:
In provider folder create a file called Counter.js
import React from "react";

const SheepsContext = React.createContext();

function Counter({ children }) {
  const [isTheCountCorrect, setIsTheCountCorrect] = React.useState(false);

  const [SheepCounter, setSheepCounter] = React.useState(1);

  return (
    <SheepsContext.Provider
      value={{
        SheepCounter,
        isTheCountCorrect,
        setSheepCounter,
        setIsTheCountCorrect,
      }}
    >
      {children}
    </SheepsContext.Provider>
  );
}

export const useSheepsContext = () => React.useContext(SheepsContext);
export default Counter;
Let's explain the code step by step:
1- First, we created a context and assigned it to SheepsContext think of it as you created a magical box to put something in it later.
2- Counter is a helper function that will help us share our states.
3- const [isTheCountCorrect, setIsTheCountCorrect] = React.useState(false)isTheCountCorrect is the variable that will help us check if the user counted the right sheep number or not
4- const [SheepCounter, setSheepCounter] = React.useState(1) This is the state that will keep track of how many sheep have been counted, at first, we initialized with 1.
5- { children } are the components that will be wrapped to the contextAPI we will see this later and get back to this point.
6- SheepsContext.Provider value={{ SheepCounter, isTheCountCorrect, setSheepCounter, setIsTheCountCorrect,``}}
think of this as we are going to put some toys into our box and allow anyone who has the box to use them. this is what the value purpose is, the variables inside of value are accessible by all the children.
7- useSheepsContext This function is the one that will be exported to use the states in any component we want. Think of it as you created a secret key that gets imported into other components to allow them to access our box.
Now we will see the actual role of the helper function so that you will have a clear idea of what it does
go to the src folder and create two files Keyboard.js and Sheep.js create a basic structure
// Sheep.js
import React from "react";

function Sheep() {

  return (
    <div>
    Sheep
    </div>
  );
}

export default Sheep;

----------------------------------------------------------------
// KeyBoard.js
import React from "react";

function KeyBoard() {

  return (
    <div>
    KeyBoard
    </div>
  );
}

export default KeyBoard;
that's enough for now.
Head to App.js and paste the following code
import "./style/style.css";
import Sheep from "./components/Sheep";
import KeyBoard from "./components/KeyBoard";
import Counter from "./provider/Counter";

function App() {
  return (
    <main>
      <Counter>
        <Sheep />
        <KeyBoard />
      </Counter>
    </main>
  );
}

export default App;
The first lines are just importing a style and Sheep ,KeyBoard, Counter components
🛑 Notice that we wrapped the <Sheep /> <KeyBoard /> inside Counter now these components are the children of Counter, go back to Counter.js and you will see that we are passing a context or in other words sharing states to all the children of the Counter, which means <Sheep /> <KeyBoard /> have access to all the things inside the value in SheepsContext.Provider we only need to import the useSheepsContext.
Create the Sheep Component :
Bref summary of the component's role :
The purpose of the Sheep component is layout the sheep image and check if your count is correct it will move the sheep away and bring a new one (this effect is made by CSS).
import React from "react";
import sheepIMG from "../assests/images/sheepImg.png";
import grrenLand from "../assests/images/greenLand.jpeg";
import { useSheepsContext } from "../provider/Counter";

function Sheep() {
  const { isTheCountCorrect } = useSheepsContext();
  const { setIsTheCountCorrect } = useSheepsContext();
  const sheepImage = React.useRef(null);
  const imageClasses = isTheCountCorrect
    ? "sheep_viwer--sheepIMG sheep_viewer__animate"
    : "sheep_viwer--sheepIMG";

  if (isTheCountCorrect) {
    // when the animation complete go and change isTheCountCorrect to false
    setTimeout(() => {
      setIsTheCountCorrect(false);
    }, 2000);
  }

  return (
    <div className="sheep_viewer">
// grrenLand is the background image of the sheep
      <img src={grrenLand} className="sheep_viewer__background" alt="land" />

      <img
        ref={sheepImage}
        src={sheepIMG}
        className={imageClasses}
        alt="sheep"
      />
    </div>
  );
}

export default Sheep;
Remember that we created global stats, We simply need to import their secret key to use them this is what these two lines do.
const { isTheCountCorrect } = useSheepsContext();
  const { setIsTheCountCorrect } = useSheepsContext();
SheepImg is an empty reference that would be used to reference our sheep image
We are doing this simply because in react it's better to avoid direct manipulation of the DOM whereas in-plane JavaScript we will use query selector or other selectors.
useRef gives a reference to a certain variable so that we will have access to it and manipulate it, Without the need for direct DOM manipulation.
Before we move on to the next lines and explain them let's see how the animation of the sheep image works.
🛑 Don't worry about the rest of CSS, The animation of the images is the most important part of it. The rest is easy CSS I will share it with you at the end of the article although I encourage you to create your own code, based on your understanding and avoid copy-pasting 😊
.sheep_viwer--sheepIMG {
  width: 400px;
  height: 200px;
  align-self: center;
  position: absolute;
  bottom: 0px;
}
the style in sheep_viwer--sheepIMG is the default style for our sheep image it will always be applied
.sheep_viewer__animate {
  animation-duration: 2s;
  animation-name: move;
}
sheep_viewer__animate is the class that will be applied whenever we want to fire the animation the following class is calling an animation named move you can call it whatever you want.
animation-duration specifies our duration which is 2 seconds we need to remember it as later on in the code we will remove the animation class when the animation ends meaning its duration has been completed.
Let's move to the most exciting part which is making the effect of a new sheep coming in and the old one going away
@keyframes move {
  0% {
    transform: translateX(0%);
  }
  40% {
    transform: translateX(150%);
  }

  50%, 70%{
    opacity: 0;
  }

  80% {
    transform: translateX(-150%);
}
  100% {
    transform: translateX(0%);
  }
}
Before I start explaining I assume you know how css transform works.
translateX will move the image to the x-axis as shown in the image below :
0% Keyframe:
- Starts at its original position.
40% Keyframe:
- When the animation is at 40% in its state the image will move to the right by 150%.
50% and 70% Keyframes:
At 50% and 70% progress, an opacity of 0 is set. This means the element becomes completely transparent and disappears during this time
giving us the effect of hiding the animation when going backward
this is the trick that makes the user believe that the current sheep moved away and a new one came in
🛑 try removing the opacity and see what happens; then you will grasp how this effect works 😎.
80% Keyframe:
At 80% progress, the element is translated horizontally by -150%, moving it to the left meaning the image now moves backward you won't see it unless you remove the opacity but now we have the image at -150% on the x-axis.
100% Keyframe:
- Finally, at 100% progress, the image is going from -150% on the x-axis to its origin position.
if (isTheCountCorrect) {
    setTimeout(() => {
      setIsTheCountCorrect(false);
    }, 2000);
  }
As you have seen in the animation-duration is 2 seconds therefore, as soon as 2 seconds pass isTheCountCorrect is going to be false.
const imageClasses = isTheCountCorrect
    ? "sheep_viwer--sheepIMG sheep_viewer__animate"
    : "sheep_viwer--sheepIMG";
The imageClasses takes the className that will be applied to the sheep image based on isTheCountCorrect which means if isTheCountCorrect is true assign the strings after the question mark else assign the string after the two-point : (this is called ternary operator)
   <img
        ref={sheepImage}
        src={sheepIMG}
        className={imageClasses}
        alt="sheep"
      />
In the code above you see ref={sheepImage}, This is a reference. Now in sheepImage
we have the reference of our sheep image to access the image and manipulate it, We will do that via its reference in sheepImage.
Create the KeyBoard Component :
Before I share the whole code with you please don't freak out 😳 as I will explain each part of the code.
import React from "react";
import { useSheepsContext } from "../provider/Counter";
import sheep_say_no from "../assests/images/sheep_say_no.png";

function KeyBoard() {
  const Inp = React.useRef(null);
  const noImage = React.useRef(null)
  const { setIsTheCountCorrect } = useSheepsContext();
  const { SheepCounter } = useSheepsContext();
  const { setSheepCounter } = useSheepsContext();

  function SetInputValue(event) {
    const clickedNumber = event.target.innerText;
    Inp.current.value += clickedNumber;
  }

  function CheckAnswer() {
    const userInp = Number(Inp.current.value);
    if (userInp === SheepCounter) {
      setIsTheCountCorrect(true);
      setSheepCounter((prevValue) => prevValue + 1);
      Inp.current.value = null;
    } else {
      noImage.current.classList.add('animate_sheep_say_no')
      Inp.current.value = null;
      setTimeout(()=>{
        noImage.current.classList.remove('animate_sheep_say_no')

      },3500)
    }
  }

  const KeyBoard = [
    [1, 2, 3],
    [4, 5, 6],
    [7, 8, 9],
  ];

  return (
    <>
    <img ref={noImage} src={sheep_say_no} alt="sheep_say_no" className="d-none" />
    <div className="keyboard">
      <input ref={Inp} className="d-none" />

      {KeyBoard.map((row, key) => (
        <div className="row-container" key={key}>
          {row.map((key, index) => (
            <div
              className="keyboard--key"
              key={`${index}-${key}`}
              onClick={SetInputValue}
            >
              {key}
            </div>
          ))}
        </div>
      ))}
      <div className="keyboard--lastRow">
        <div className="keyboard--key" onClick={SetInputValue}>
          0
        </div>
        <div className="keyboard--submit" onClick={CheckAnswer}>
          Go
        </div>
      </div>
    </div>
    </>

  );
}

export default KeyBoard;
The third import is importing an image from the path that I specified you can skip that and use another image via its URL.
InpandnoImageare React ref objects used to reference DOM elements.setIsTheCountCorrect,SheepCounter, andsetSheepCounterare values and functions obtained from a context provider (via theuseSheepsContexthook) to manage and update the state related to a sheep counting application.
The role of this component is to create the keyboard and check the user input.
You cannot see any input in the application because we will create a hidden input
1- First, Let's create the reference that will hold the input, by default the input should be empty.
const Inp = React.useRef(null);
Inside the return statement of the component place the input below.
🛑 Don't forget to wrap all the code inside the return statement with one parent or an empty fraction (<> </>) .
<input ref={Inp} className="d-none" /> // the d-none makes the input invisible
2- Let's create the keyboard :
The keyboard will contain the numbers from 1-9 don't worry about 0 we will set it later
  const KeyBoard = [
    [1, 2, 3],
    [4, 5, 6],
    [7, 8, 9],
  ];
We are using the two-demoniacal array (array of arrays) so that each row in our keyboard array will represent a row in the actual keyboard.
   {KeyBoard.map((row, key) => (
        <div className="row-container" key={key}>
          {row.map((key, index) => (
            <div
              className="keyboard--key"
              key={`${index}-${key}`}
              onClick={SetInputValue}
            >
              {key}
            </div>
          ))}
As you may know, that map takes two parameters the first one is the current iterated item of the array and the second one is the index.
Therefore, in each row, we are going to warp it into a div with the class name
row-container.
Then calling another map to loop into each row in KeyBoard array then printing the value of the current looped key.
As you notice we are setting an event Listener on each key
3- Let's see the Events Listener :
  function SetInputValue(event) {
    const clickedNumber = event.target.innerText;
    Inp.current.value += clickedNumber;
  }
The SetInputValue function is going to be called each time a click happens on our keyboard.
The constant is clickedNumber is extracting the number as you saw previously in our keyboard the numbers were output as text to each key in the keyboard
therefore, to extract it we are using the innerText.
Inp.current.value += clickedNumber This line adds the new clicked number to whatever number was in the hidden input.
Know we can see the input and store whatever we write in the hidden input but we can not submit our answer so let's do that.
4-Submit the answer and check it :
<div className="keyboard--lastRow">

        <div className="keyboard--key" onClick={SetInputValue}>
          0
        </div>
        <div className="keyboard--submit" onClick={CheckAnswer}>
          Go
        </div>
</div>
The first div is just for styling purposes which is not the purpose of this article, whereas the second dive represents the 0 as a keyboard key and works same as the previous keyboard keys
The third div purpose is to check the answer and have an event listener called CheckAnswer which checks if the answer is correct will move the cheep image and increase the value of SheepCounter by one
5- CheckAnswer function :
  function CheckAnswer() {
    const userInp = Number(Inp.current.value);
    if (userInp === SheepCounter) {
      setIsTheCountCorrect(true);
      setSheepCounter((prevValue) => prevValue + 1);
      Inp.current.value = null;
    } else {
      noImage.current.classList.add('animate_sheep_say_no')
      Inp.current.value = null; // clear the input
      setTimeout(()=>{
        noImage.current.classList.remove('animate_sheep_say_no')

      },3500)
    }
  }
First, we convert the input value to a number and store it in userInp
Correct answer :
as you recall we have a global state that we import to work with and its role is to keep count of the sheep
therefore we are comparing the user input with SheepCounter which holds the number of sheep if the condition is true we want the animation to start so we change the value of isTheCountCorrect to false via its function.
Then we increase the value of the sheep by 1 via the SheepCounter function
Finally, we empty our input.
Wrong answer :
If the user's input does not match the SheepCounter value, the else block is executed:
noImage.current.classList.add('animate_sheep_say_no'): This line adds a CSS class 'animate_sheep_say_no' to an element referenced by noImage.current. This class triggers an animation (making an image of a sheep say "no").
Inp.current.value = null: Similar to the previous case, this line clears the input field by setting its value to null.
setTimeout(() => {
noImage.current.classList.remove('animate_sheep_say_no')
}, 3500);
This code schedules the removal of the 'animate_sheep_say_no' class from the element referenced by noImage.current after a delay of 3500 milliseconds (3.5 seconds). This provides a brief animation effect in response to an incorrect input, which is then removed.
Conclusion :
Well done! You followed along to the end – give yourself a pat on the back. Congratulations! Throughout this article, you have learned how to use ContextAPI to work with global state while also avoiding direct DOM manipulation by using the useRef hook.
I hope that you enjoyed and learned from this article I would like to highlight this one more time if you have any questions or misunderstood something please contact me via Instagram.
I work as a freelance software developer. I've got you covered if you need a web application, desktop application, automation solutions, or even SEO and design improvements for your existing page! 🌐💻✨
Contact me at code-with-amine@gmail.com and let’s build what you’re looking for. 🚀
Before we are done here is. the CSS you can just copy and paste into a file named style.css you should create it in the style folder.
* {
  box-sizing: border-box;
}

body {
  padding: 0;
  margin: 0;
  background-color: #487346;
  background-image: url("data:image/svg+xml,%3Csvg xmlns='http://www.w3.org/2000/svg' width='145' height='145' viewBox='0 0 200 200'%3E%3Cg %3E%3Cpolygon fill='%234c8e43' points='100 57.1 64 93.1 71.5 100.6 100 72.1'/%3E%3Cpolygon fill='%236aac5f' points='100 57.1 100 72.1 128.6 100.6 136.1 93.1'/%3E%3Cpolygon fill='%234c8e43' points='100 163.2 100 178.2 170.7 107.5 170.8 92.4'/%3E%3Cpolygon fill='%236aac5f' points='100 163.2 29.2 92.5 29.2 107.5 100 178.2'/%3E%3Cpath fill='%2389CC7C' d='M100 21.8L29.2 92.5l70.7 70.7l70.7-70.7L100 21.8z M100 127.9L64.6 92.5L100 57.1l35.4 35.4L100 127.9z'/%3E%3Cpolygon fill='%23768c3a' points='0 157.1 0 172.1 28.6 200.6 36.1 193.1'/%3E%3Cpolygon fill='%2396ac58' points='70.7 200 70.8 192.4 63.2 200'/%3E%3Cpolygon fill='%23B6CC76' points='27.8 200 63.2 200 70.7 192.5 0 121.8 0 157.2 35.3 192.5'/%3E%3Cpolygon fill='%2396ac58' points='200 157.1 164 193.1 171.5 200.6 200 172.1'/%3E%3Cpolygon fill='%23768c3a' points='136.7 200 129.2 192.5 129.2 200'/%3E%3Cpolygon fill='%23B6CC76' points='172.1 200 164.6 192.5 200 157.1 200 157.2 200 121.8 200 121.8 129.2 192.5 136.7 200'/%3E%3Cpolygon fill='%23768c3a' points='129.2 0 129.2 7.5 200 78.2 200 63.2 136.7 0'/%3E%3Cpolygon fill='%23B6CC76' points='200 27.8 200 27.9 172.1 0 136.7 0 200 63.2 200 63.2'/%3E%3Cpolygon fill='%2396ac58' points='63.2 0 0 63.2 0 78.2 70.7 7.5 70.7 0'/%3E%3Cpolygon fill='%23B6CC76' points='0 63.2 63.2 0 27.8 0 0 27.8'/%3E%3C/g%3E%3C/svg%3E");
  width: 100vw;
  max-height: 100vh;
  position: relative;
}

main {
  max-width: 800px;
  margin: 10px auto;
  border: 4px solid black;
  height: 100vh;
  display: flex;
  flex-direction: column;
  overflow-y: scroll;
  overflow-x: hidden;
}

.sheep_viewer__background {
  width: 100%;
  height: 100%;
}

.sheep_viewer {
  width: 100%;
  display: flex;
  flex-direction: column;
  position: relative;
}

.sheep_viwer--sheepIMG {
  width: 400px;
  height: 200px;
  align-self: center;
  position: absolute;
  bottom: 0px;
}

.sheep_viewer__animate {
  animation-duration: 2s;
  animation-name: move;
}


@keyframes move {
  0% {
    transform: translate(0%) translateY(30%);
  }
  40% {
    transform: translate(150%) translateY(10%);
  }

  50%, 70%{
    opacity: 0;
  }

  80% {
    transform: translate(-150%);
}
  100% {
    transform: translate(0%);
  }
}

.row-container {
  display: grid;
  grid-template-columns: repeat(3, 1fr);
}

.keyboard--key {
  background-color: #d3d3d3;
  border: 2px solid black;
  border-radius: 5px;
  padding: 20px;
  text-align: center;
}

.keyboard {
  width: 100%;
}

.keyboard > div {
  cursor: pointer;
}

.keyboard--submit {
  background-color: #d3d3d3;
  width: 100%;
  padding: 12px;
  text-align: center;
  font-weight: bold;
  border: 1px solid black;
}

.keyboard--lastRow {
  display: grid;
  grid-template-columns: repeat(4, 1fr); /* Create 4 equal columns */
}

.keyboard--submit {
  grid-column: span 3; /* Span 3 columns */
}

.d-none{
    display: none;
}

.animate_sheep_say_no{
    width: 300px;
    height: 300px;
    position: absolute;
    display: block;
    animation-duration: 4s;
    animation-name: highlightWrong;
    animation-fill-mode: forwards;
}

@keyframes highlightWrong {
    from{
        top: -150px;
        left: 50%;
        opacity: 1;
    }
    to{
        top: 0px;
        opacity: .5;
        left: 50%;

    }
}

@media screen and (max-width: 768px){
  .sheep_viwer--sheepIMG {
    width: 250px;
    height: 100px;
  }
  .animate_sheep_say_no{
      width: 200px;
      height: 200px;
  }
}